One Light Portrait

one light portraitThink you need a full studio to take a terrific dramatic portrait?

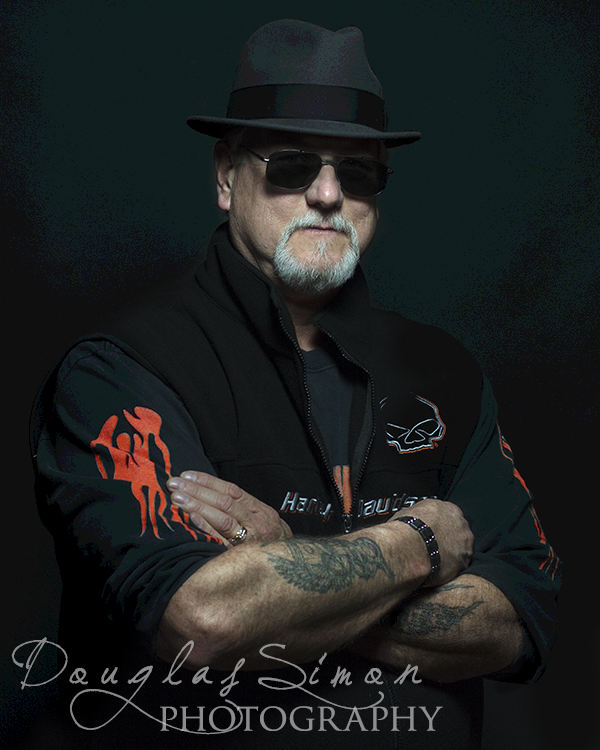
This is a simple one light portrait, referred to as “Paramount Lighting” (AKA “Butterfly Lighting”).  Paramount Lighting was developed by a photographer at Paramount Studios in the 1930s. It was a dramatic and easy way to take publicity photos of their stars. It was an easy setup and proved to be very dramatic. Read more.

I used a 300 watt daylight fluorescent bulb and a small 16″ square soft-box with one diffuser panel. (No flash, continuous light)  Placed above the camera, pointed at the subject.  Used a tripod.

  • Aperture 2.8
  • Shutter Speed 1/160
  • ISO 640
  • 50mm 1.4 lens

In Photoshop I posterized the background, and saturated the orange decals.

Dog Portrait

PortraitA simple shot:
35mm
Aperture wide open at 1.4
ISO 250
shutter speed 1/125

The dog is napping on the bed. To keep the camera steady I set it on a book.  The biggest challenge was waiting for the moment when the sun came around to the right spot through the window; and of course: trusting the subject would remain still! I chose to blow the shot out – no Photoshopping.

Christmas Tree Photo

Shooting Christmas Tree Lights

Take a Great Christmas Tree Photo!   Photo 1

It’s that time of the year.  Your Christmas tree is decorated and you want to capture the beauty, only to find the flash is washing out the lights. You just can’t capture the mood.

The only light source needed is the string of tree lights.  Even the background wall (on photo 1) is a reflection from the tree lights.  Make sure your lights are NOT twinkling.  Find just the right distance, angle and proper eye line to place the camera.  You need a tripod to steady the camera.  You’ll need to custom white balance.  Tree lights (LED lights) are about 2500K for custom white balance.  I used a 35mm lens on my Canon 7D.  The ISO for both of these shots is set to 100.

Photo 1:
Aperture is 2.8
Shutter Speed set to 2.5 seconds

Close up Christmas Photo

Get a great close up – easily!  Photo 2

Photo 2 – Close up of tree branch:
Aperture is 5.6
Shutter Speed set to 6 seconds.

How to Get a Heavenly Glow for Your Bible

You don’t need special lighting for this one.  Turn off your flash, put your camera on manual.

Heavenly BibleThis is a simple shot.  You need one household goose-neck lamp with an 18 watt 2700 K energy saver warm bulb.  When you purchase energy saver bulbs you’ll notice you often have a choice between daylight balanced and soft white (might read “warm”).  Soft white/warm is the typical indoor lighting we all use.  This table is pine with a flat finish.  The reflection comes from the gold gilded page edges.

Turn off the lights in the room.  Focus your goose-neck on the edge of the book.  Experiment with camera angles.  Use a tripod and a self timer or a remote control.   Very simple.

Canon 7D used
Camera settings:
lens:  100mm f/2.8 macro
shutter speed: 1/50
aperture: 2.8
ISO: 200
white balance: “white florescent light” (if using a Canon 7D)
your camera may have a similar setting option, go to the menu and find “white balance”

Have fun!

What is bokeh?

Bokeh is the background blurred effect created by being out of focus, using a wide aperture.

This image was taken using a 35mm lens 2.8 aperture.  Notice the trees and the motorcycle headlight are all out of focus, yet the subjects are in clear focus.  That’s the art of getting bokeh by using a wide aperture. Unfortunately, the better the bokeh – the more expensive the lens.

Remember when using a wide open aperture focusing becomes difficult.  The wider the aperture the narrower the focus field.  At 1.2 or 1.4 you’re dealing with inches on a horizontal plane.  Sometimes pinpoint manual focusing is necessary through using Live View – if using Canon 7D.

Practice, practice, practice.

Furniture Photo

You’re wanting to photograph your new dining room table.  That lovely finish reflects your flash, ruining your shot.

You need to shoot without flash.  That means getting as much area light as you can, but that light needs to be the “same” light.  You don’t want your dining room curtains open letting in sunlight mixing with your fixture lights.  This results in mixing warm and cold light and the results are adverse. Close the curtains and turn on all available lights.

The advantage in shooting inanimate objects is you can use low shutter speed.  You need to use a tripod for low shutter speeds.  Lower your ISO. If you’re at 800, try 400 AND lower the shutter speed.  Keep going lower until you achieve the desired photo.  Test test, test.

You can see examples of product photography.

Furniture photo

Sunlight

portrait photography

This is a simple shot.  It was thought out prior to being on location.  Even if you don’t have a 35mm wide angle lens, you can apply 2 techniques: sunlight on the faces, and use a short ladder.

It’s the angle which gives this a creative, fresh look.  The color photo was fabulous, but this is where Photoshop is so useful.  Turn the image into black and white, add a hue adjustment layer and mask out everything except for one pair of sunglasses.  Subtle touches make a big statement.  Once, again: it’s about controlling the elements.  Have fun!

Take Better Photos

Not everything in photography has to be expensive.  And the reverse is true – even the best equipment won’t give you excellent photos.

Don’t succumb to the idea: “I’ll fix it in Photoshop”.  Capture the best image – bring it into Photoshop when you’re ready to enhance the photo, or correct a blemish.

It’s about lighting.  The camera sees the light you allow.  If your camera has manual settings you can begin grabbing great shots in a variety of lighting situations.  There are 3 main areas to learn – ISO, aperture and shutter speed.

To begin – play with the ISO.  Set your camera still.  If you have a tripod great – if you have a timer or trigger even better.  Despite how still your hand is even pushing the button will jiggle the camera.  Remove that element.  Begin setting your camera at a low ISO 100 (typically for outdoors).  Take a shot – increase to the next available ISO and continue your testing.  This exercise will open up to you how your camera is processing at these ISOs.

It’s a simple beginning, with you controlling the camera!  Have fun.